
June 10, 2026
Automate Your Exhaust, Whole-House, and Attic Fans with Alarm.com
Almost every fan in your home depends on someone remembering to flip a switch. The bathroom fan stays off through a steamy shower because the last person out never touched it, and then it runs all afternoon because someone else forgot to turn it off. The kitchen fan sits idle while smoke drifts toward the smoke alarm. The whole-house fan only cools the house if you walk over and turn it on at the right hour, and the attic bakes all afternoon while the air conditioner works harder to make up for it. Every one of those is a small, fixable problem, and the fix is the same: take the fan off the wall switch and put it on a schedule, a sensor, or a rule.
This guide shows how to do that with Alarm.com, the professional-grade platform Surety Home sells and supports for self-installed systems. If you already run an Alarm.com system, you can bring your fans into the same app you use to arm the house, watch the cameras, and lock the doors. If you do not have Alarm.com yet, this is a good example of what a real automation platform does that a pile of disconnected gadgets cannot: one app, one set of rules, and your security and your ventilation working together. The tool that makes it possible is a small Z-Wave relay or smart switch, and the idea builds directly on our earlier guide, Digital Outputs Explained. It is the same playbook we used in How to Automate Your Pool or Spa Pump with Alarm.com and How to Automate Landscape Lighting with Alarm.com, now pointed at the fans you already own.
One thing sets this project apart from those earlier ones. Pool, irrigation, and landscape lighting all switch low-voltage power. Most home fans are 120V line-voltage motor loads run from a wall switch, so the hardware choices and the safety rules are different, and we will be clear about both. There are three ways to put a fan on Alarm.com, and which one fits depends on how your fan is wired and whether you want to keep your existing switch. We will walk through all three, the sensors that make the automation genuinely useful, and where the limits and the safety lines are.
Why Putting Your Fans on Alarm.com Is Worth It
Each fan earns its automation in a different way, so it helps to look at them one at a time.
Bathroom exhaust fans: moisture and mold control
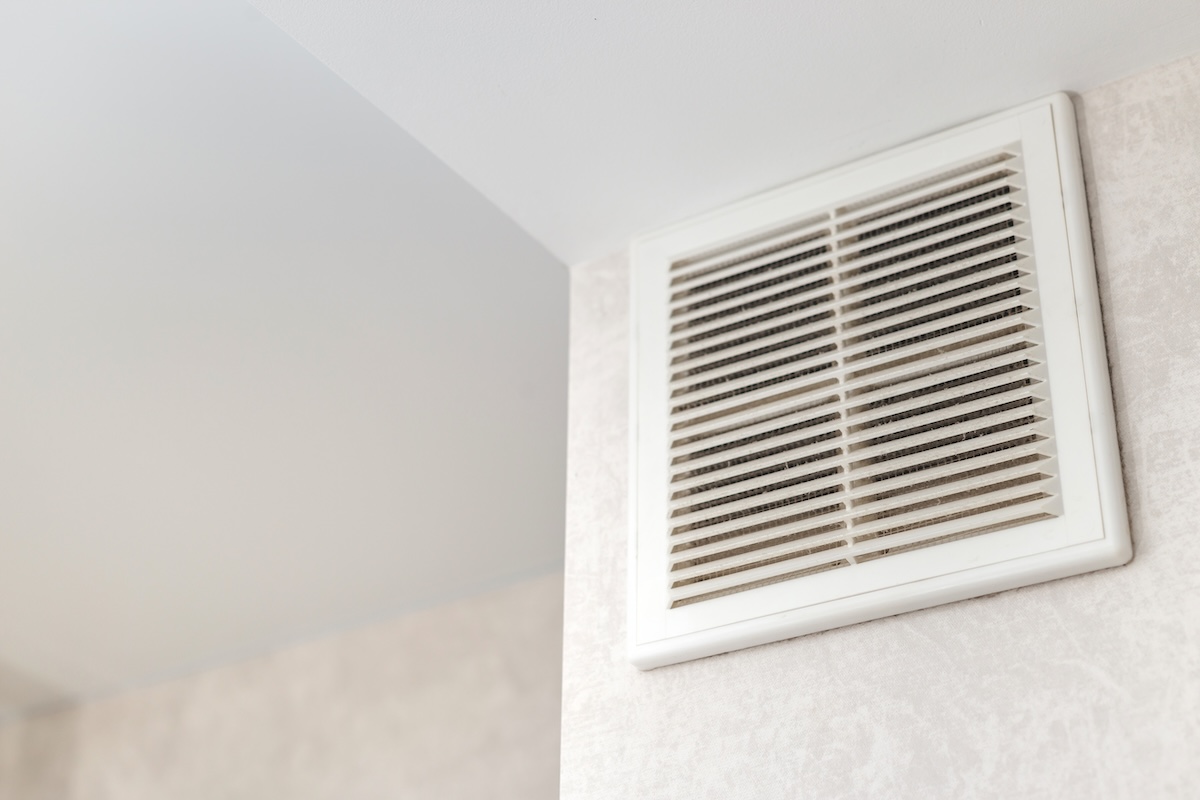
This is the headline win. A shower dumps a burst of humidity into a small, enclosed room, and that moisture soaks into grout, paint, drywall, and the cavities behind them, where it feeds mold and mildew. The U.S. Environmental Protection Agency advises keeping indoor relative humidity below 60 percent, and ideally between 30 and 50 percent, to limit mold growth, and it notes that everyday activities like cooking and showering add moisture to the air that inadequate ventilation lets build up. The same EPA guidance points out that wet materials should be dried within 24 to 48 hours to avoid mold, and that increasing air circulation speeds that drying. A bathroom fan that runs while humidity is high and keeps running until the room dries out is doing exactly that job.
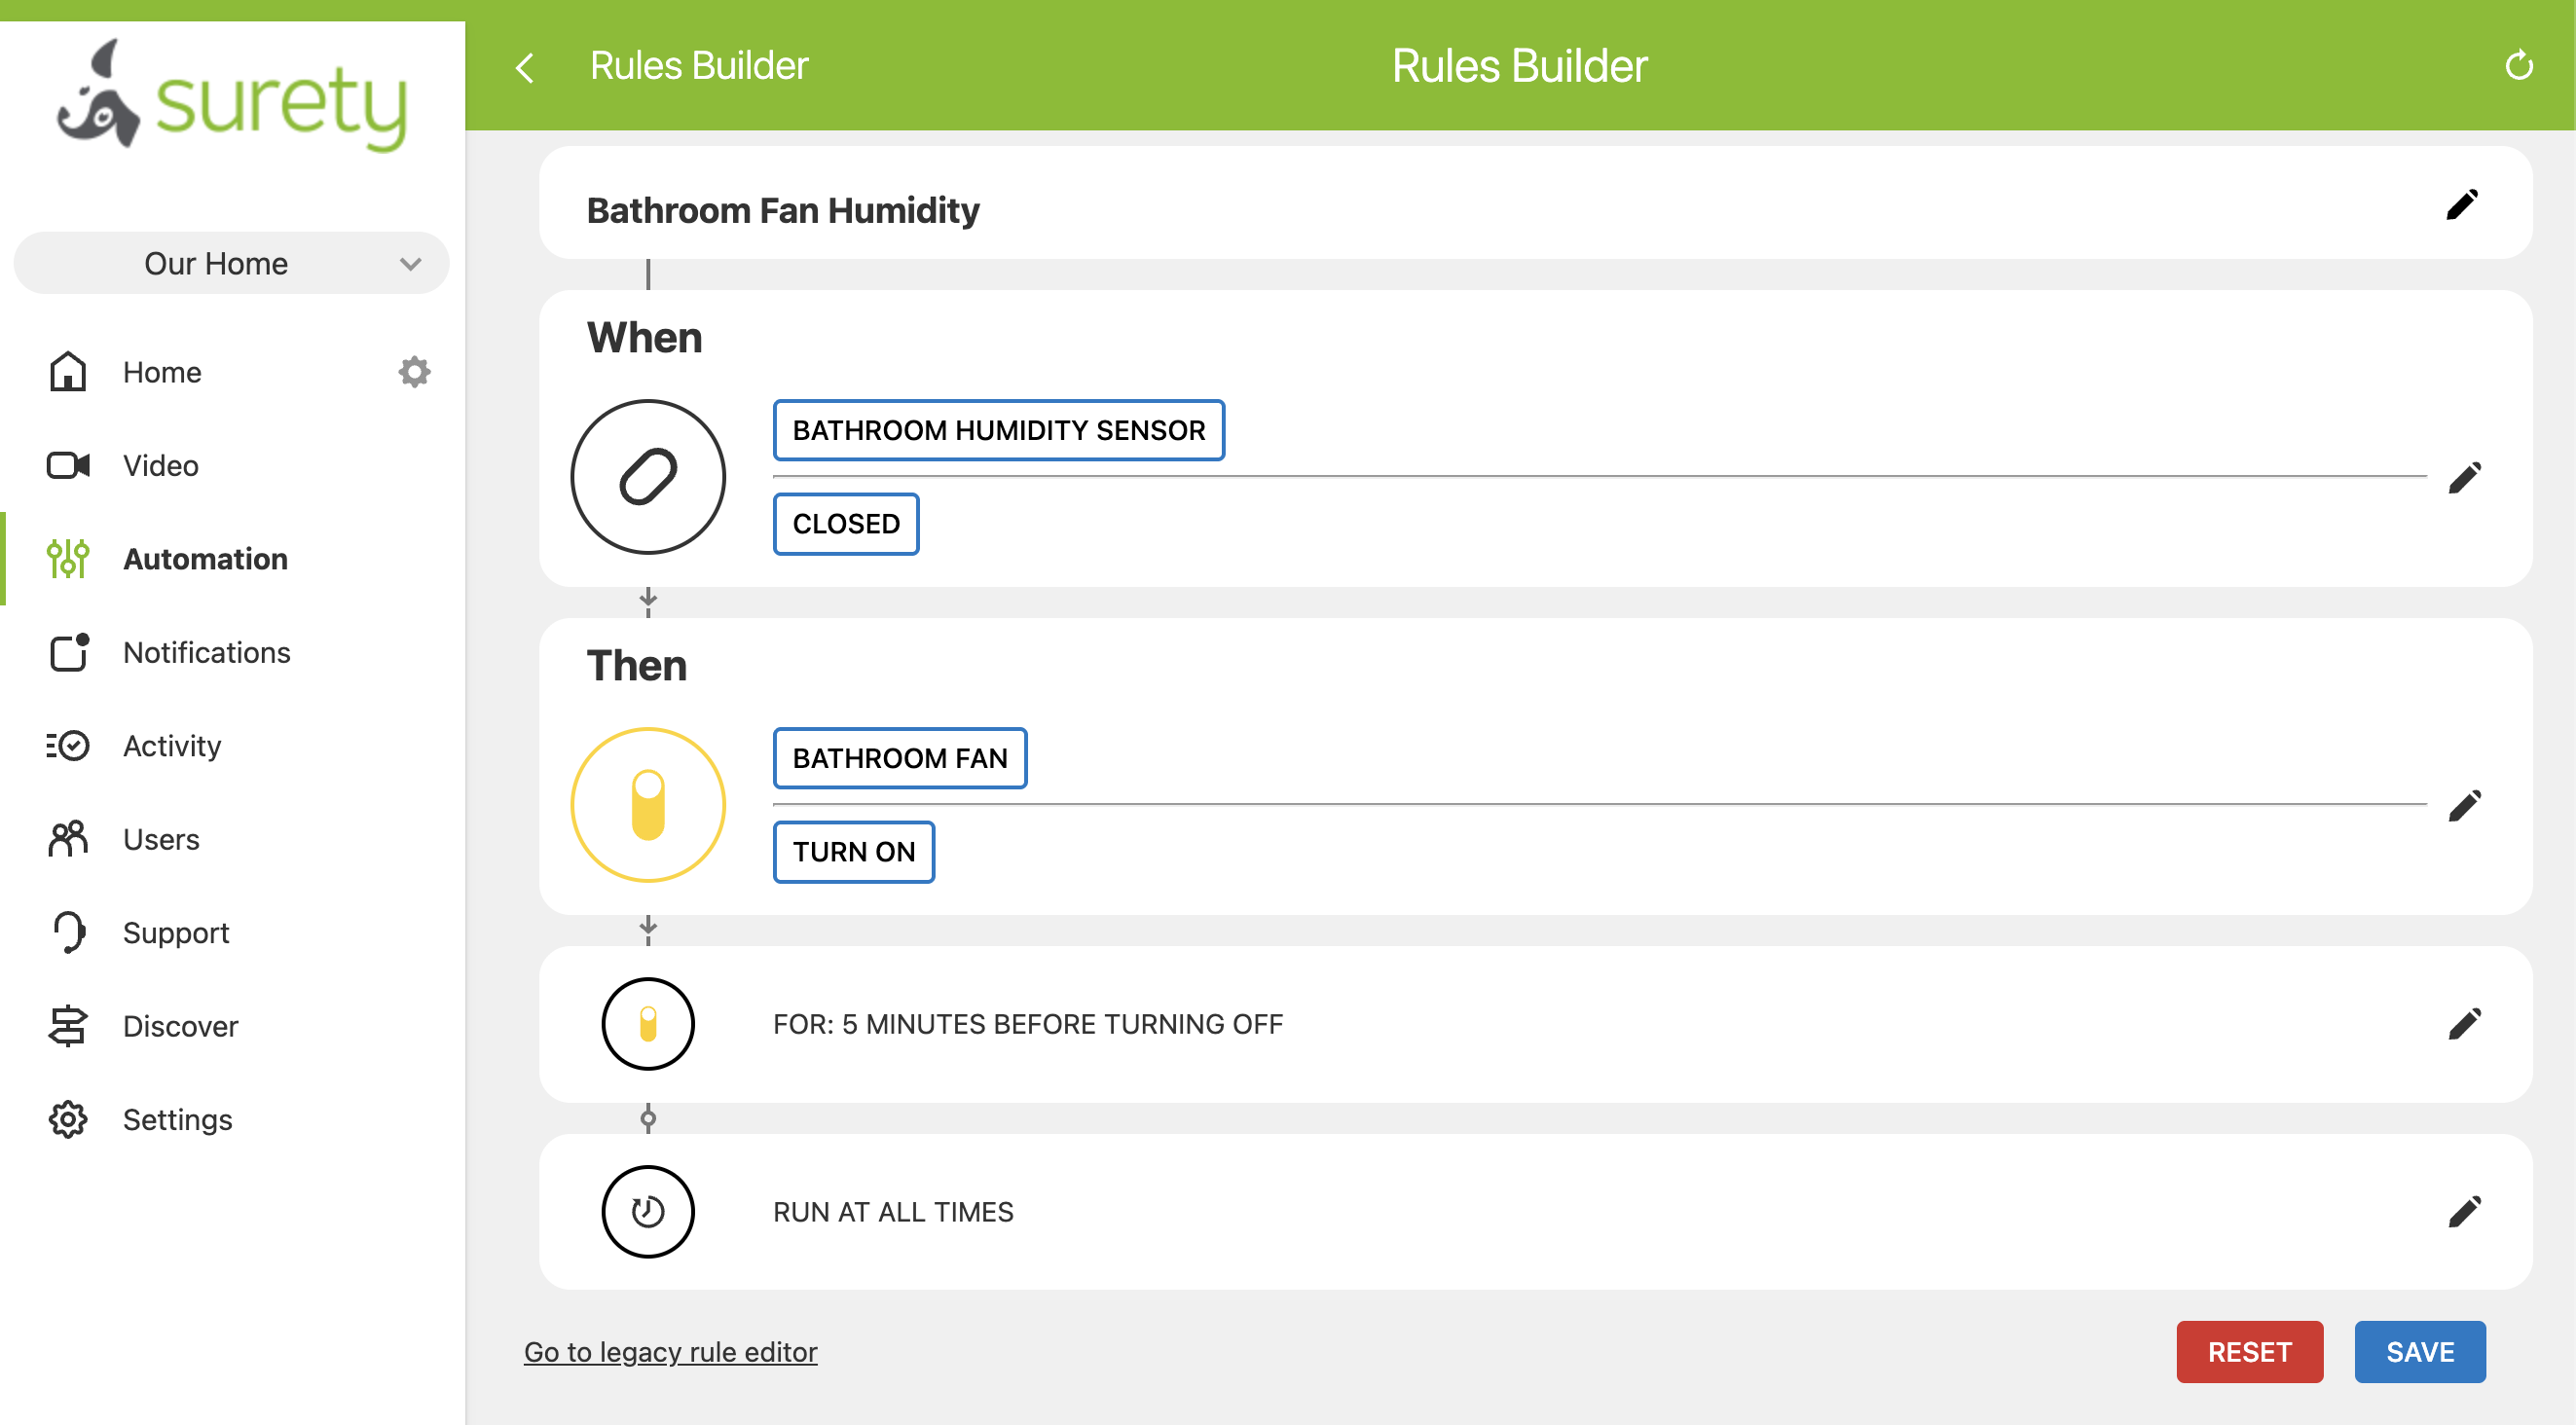
The trouble is that the job depends on people. Kids and guests rarely touch the fan, and the family member who does often switches it off too soon. Automation removes the human from the loop: when humidity climbs, Alarm.com turns the fan on, runs it for a set time so it finishes the job, and then turns it off on its own. How that shut-off works matters, because Alarm.com only turns a fan off automatically if a rule or a schedule is what turned it on. So let a rule (such as the humidity rule or a motion rule) or a schedule start the fan, after which it reliably shuts itself off after a set time. That timed shut-off comes only with a rule or a schedule: a fan that someone flips on by hand at the wall, or even one switched on by a one-tap scene, is not something Alarm.com will turn off later. The fan also only helps if it actually vents to the outside. A fan that dumps into the attic just relocates the moisture problem.
Kitchen exhaust fans: clear the air faster
A kitchen vent fan clears smoke, steam, grease, and cooking odors before they spread through the house or set off a smoke alarm. With the fan on Alarm.com, a one-tap or voice scene can switch it on (along with the light) the moment you begin cooking. A scene only turns devices on, though, so for a hands-off shut-off you would use a rule or a schedule, for example a motion rule that runs the fan while the kitchen is in use and then turns it off after a set time. Alarm.com only turns a fan off automatically when a rule or a schedule turned it on, so a scene or a manual tap leaves turning it off to you. Two notes: many range hoods have their own multi-speed control built into the hood, so here automation is usually about on/off and a timed run-on rather than speed, and a hood that recirculates instead of venting outdoors does far less for humidity and grease.
Whole-house fans: low-energy cooling
A whole-house fan pulls cooler outdoor air in through open windows and pushes hot indoor air up and out through the attic and roof vents, cooling both the house and the attic when the outside air is cooler than inside, typically in the evening, overnight, and early morning. The U.S. Department of Energy presents whole-house fans as a low-energy alternative or complement to air conditioning that can cut cooling costs in suitable climates, since a fan draws far less power than a compressor. Automating it means it runs when it actually helps (an evening or overnight schedule, or a temperature trigger) and shuts off once the house has cooled, instead of waiting for someone to remember.
There is a serious safety rule attached to whole-house fans, and automation must respect it: the fan needs enough open windows and adequate attic venting whenever it runs. Run it sealed up and it can backdraft combustion appliances like a furnace, water heater, or fireplace, pulling dangerous gases into the home. So a whole-house fan rule should never silently start the fan with the house closed. We cover a window-open interlock below, and you should read your fan’s manual and follow its ventilation requirements.
Attic fans: cut attic heat
An attic ventilator exhausts superheated attic air to lower the attic temperature, which can ease the cooling load on the living space and reduce heat stress on the roof. The DOE notes a real tradeoff: attic fans are not universally beneficial, and if the attic and ducts are not well sealed, an attic fan can actually pull conditioned air out of the living space, which is why many experts favor sealing, insulation, and passive ventilation first. If your attic is properly sealed and vented, automating the fan on a temperature trigger or a seasonal schedule is a reasonable way to keep it from running when it should not.
First, a Word on Fan Speed
Before the hardware, one thing to know: the relays and switches in this guide are on/off devices, not variable-speed controls. That is a non-issue for most bathroom and kitchen exhaust fans, which are single-speed anyway, and on/off plus a run-on timer is exactly what they need. Do not try to solve speed with a standard light dimmer. Fan motors are inductive loads, and a regular dimmer can buzz, overheat, or shorten the motor’s life. For a multi-speed fan, you do not get a smooth dial through these devices; you can use a multi-relay to select among the fan’s existing fixed speed taps (one at a time, covered in Case 3), or simply automate on/off and leave speed selection on the fan. True variable-speed control needs a dedicated fan-speed controller, which is outside the scope of this approach.
Case 1: Replace the Wall Switch with a Z-Wave Switch
This is the simplest path when three things are true: the fan runs off an ordinary single-pole wall switch, there is a neutral wire in the switch box (most Z-Wave switches need one), and the fan’s motor draw fits the switch’s fan-motor rating. You remove the dumb switch, install a Z-Wave switch, and the fan becomes an Alarm.com device while the paddle still works by hand. The tradeoff is that you change the look of the switch, and you have to choose a switch rated for a fan motor, not just for lighting.
For a fan on its own, use a Z-Wave on/off switch rated for fan motors. The Zooz ZEN71 On/Off Switch is a good example: per Zooz it handles 960W incandescent, 150W LED or CFL, 1800W (15A) resistive, and 3A fan motors at 120V. The limit to watch is that 3A figure. It is plenty for a typical bathroom or kitchen exhaust fan, which draws well under an amp, but it is not enough for a large whole-house fan or a big multi-amp motor, so match the switch to the fan.
For a fan and light sharing a stacked or double wall switch, use the Zooz ZEN30 Double Switch, which Zooz sells specifically as a replacement for a stacked fan/light switch. The wiring nuance matters here: on the ZEN30 the relay button controls the fan motor (rated 15A, up to 1/2 HP) and the dimmer controls the light. Per Zooz, the dimmer side must not drive a fan (it is rated for lights only, 75W LED or 250W incandescent, with an explicit “don’t use with fans”), so the fan goes on the relay button and the light on the dimmer. One more catch from Zooz: the ZEN30 will not split a single switched wire into two loads, so if your fan and light currently share one switched hot, you will need separate conductors to control them independently.
Case 2: Add a Relay Behind the Switch, and Keep Your Switch
This is the most flexible path, and the right one if you want to keep your existing switch and wall plate, if there is no neutral in the switch box, or if a fan and light share one switch and you want to control them independently. A tiny in-wall relay does the switching, tucked behind the existing switch or up at the fan, and the original switch is wired to the relay’s input so it still works as a manual override while the relay adds Z-Wave control and status reporting.
For a single fan, the default is the Zooz ZEN51 Dry Contact Relay. Per Zooz it is a 120-240V on/off relay rated for 1/2 HP fan motors (plus 960W incandescent, 150W LED, and 10A resistive), small enough to fit in the switch box or up in the fan canopy, and it accepts a mechanical or momentary switch on its input for parallel manual control, so your existing wall switch keeps working and Alarm.com still sees the on/off events. One caveat from Zooz: the switch wired to the relay must be a simple mechanical or momentary switch, not a dimmer and not an illuminated switch. If your switch box has no neutral, this is the relay’s moment to shine: mount the ZEN51 at the fan or fixture, where the neutral is present, and keep the wall switch in the loop.
For a fan and light combo behind one switch, where you want to keep the switch, use the Zooz ZEN52 Double Relay, which Zooz markets explicitly for separating a fan motor and a fan light that share one switch, with the relay placed in the canopy and the two loads wired to its two channels. Per Zooz the ZEN52 has two independent 120-240V relays rated 5A resistive and 1/4 HP fan motor per channel (500W incandescent or 150W LED per channel), so one channel runs the fan and the other the light, and each appears as its own device in Alarm.com. The 1/4 HP per-channel limit is fine for ordinary exhaust fans, just smaller than the ZEN51’s single 1/2 HP channel.
Case 3: No Wall Switch at All
Some fans have no convenient switch to work with: a whole-house or attic fan on a dedicated circuit or a separate timer, a fan wired to run continuously, or a fan controlled only by a pull chain or a built-in thermostat. Here you add a relay inline on the fan’s circuit, or on its low-voltage control side, so Alarm.com can switch it where no switch existed before.
For whole-house and attic fans, the primary pick is the Zooz ZEN17 Universal Relay. Zooz builds it for exactly this, describing it as “perfect to optimize energy use around your HVAC system through automated damper or whole-house fan control.” It provides two dry-contact relays, each selectable as normally-open or normally-closed (up to 20A and 1/2 HP on the normally-open side, 10A and 1/4 HP normally-closed), plus two input terminals for sensors, and it is powered by 12-24V or a USB-C plug rather than line voltage. That low-voltage powering is what makes it well suited to switching a fan’s low-voltage control or a contactor coil rather than carrying the motor current itself.
For a multi-speed whole-house or attic fan with a high/low/off control, where you want Alarm.com to select the speed, use the Zooz ZEN16 MultiRelay, which has three independent dry-contact relays (rated 15A, 15A, and 20A) and is powered by 12-24V or USB-C. It helps to understand how a multi-speed motor actually works. A tapped-winding motor selects speed by energizing a separate speed tap, and you must never energize two taps at once, because doing so back-feeds between the windings and can overheat the motor, trip the breaker, or damage it. You wire the line hot to the relays’ common feed and each relay output to one speed tap (for example relay one to low and relay two to high), with the motor’s common carried straight through; both relays open is “off.”
Out of the box, the ZEN16’s three relays are independent, so they will happily close two at once if a rule overlaps, a command is missed, or the device powers back up with two relays on. The fix is the ZEN16’s built-in DC Motor Mode (Parameter 24), which syncs the relays so only one can be active at a time: value 1 interlocks relays one and two for a two-speed fan, and value 2 interlocks all three for a three-speed fan. With it enabled, selecting high automatically drops low. The catch is that this parameter has to be set through the device’s advanced Z-Wave configuration. The good news is that if you have a Qolsys IQ Panel 4 or IQ Panel 5 on software version 4.5 or higher, you can set Z-Wave parameters directly from the panel. Follow our step-by-step guide, How To Set Z-Wave Device Parameters with IQ Panel, to set Parameter 24 (this is an advanced feature, so proceed carefully). If your panel is on an earlier software version or you would rather use another controller, you can instead configure the parameter on a hub that exposes Z-Wave parameters and then move the device to your Qolsys panel, since the setting lives in the relay’s own memory (the same approach we describe in the pool pump guide). Two easy options are the Zooz Z-Box Hub, which surfaces every Zooz parameter natively, or an inexpensive Hubitat Elevation hub, which Zooz publishes ZEN16 instructions for. On either one you pair the ZEN16 to the hub, open its device settings, set Parameter 24, then exclude it from the hub and include it on your panel. Because the parameter is stored on the device, it persists after the move. Confirm the relay is on recent firmware first (DC Motor Mode was added in a later revision), test that the outputs actually interlock before wiring to the fan, and treat the interlock as a capability to confirm for your specific setup with Surety Home. Set the power-failure state (Parameter 1) to “all relays off” so a power blip cannot bring up two taps, and even with the hardware interlock enabled, still build your Alarm.com scenes to call only one speed at a time. The hardware protection and the disciplined automation work together. Many readers will prefer the simpler route: use a single relay as a master on/off and leave speed selection on the fan’s existing high/low switch. You keep app control and automation with no interlock concern at all.
For an oversized whole-house fan whose motor exceeds the ZEN17’s 20A and 1/2 HP rating, the Zooz ZEN78 High Power Relay stays within the same Zooz lineup. Per Zooz it handles 40A and 9600W resistive, with an inductive (motor) rating of 4 HP for 5,000 cycles or 3 HP for 20,000 cycles, works on 120V or 240V (two double-pole 40A relays that disconnect both hot legs on 240V), and adds power monitoring (watts, kWh, volts, amps), overload protection, and an integrated temperature sensor with overheat alerts, plus an optional dry-contact manual switch. Two caveats. First, Zooz states directly that alarm panels like Alarm.com will typically recognize the ZEN78 only as a simple on/off device and that Alarm.com itself has to support the integration, so confirm compatibility with Surety Home before buying. In practice that means the ZEN78’s power monitoring will not show up in the Alarm.com app, so do not choose it for the metering if Alarm.com is where you want to see the data. Second, a motor this size means a dedicated line-voltage circuit and a licensed electrician, and for frequent switching it is often best to use the relay to drive a properly rated contactor rather than cycling the full motor current through the module.
A whole-house or attic fan is the part of this whole project that is actually about saving energy, so seeing its consumption in the app is genuinely useful, and that is true even when the motor is not especially large. If you want that energy visibility, consider the Aeotec Heavy Duty Smart Switch (model ZW078). It is also a 40A heavy-duty relay for 120/240V loads, but unlike the ZEN78 its power and energy monitoring is already supported in Alarm.com, so the fan’s watts and kilowatt-hours actually appear in the same app you use for everything else, turning the “it costs far less than air conditioning” claim into a number you can watch. Treat it as an optional upgrade rather than the default. The ZEN17 is still the better everyday pick for a normal-sized whole-house or attic fan: it is smaller, less expensive, and low-voltage powered, so it can drive a contactor instead of carrying the motor current, and it is 800-series with Z-Wave Long Range. The ZW078 makes sense specifically when energy data in Alarm.com is the goal, and it comes with three tradeoffs to weigh: it is a bigger, pricier device than a normal fan needs, it switches line voltage directly, and it is built on older 500-series Z-Wave, so it does not support Z-Wave Long Range and leans on the regular mesh, which can matter for a fan in a distant attic (you may need a repeater in between). This is a whole-house and attic fan idea only; for a bathroom or kitchen exhaust fan the draw is a fraction of an amp and the energy is trivial, so a 40A heavy-duty switch there is needless overkill. Either way, match the device to the fan’s nameplate rating, keep the heavy-load safety rules (dedicated circuit, licensed electrician, a contactor for frequent switching of a big motor), and confirm current compatibility and the energy-reporting setup with Surety Home before buying.
One safety theme runs through this whole case: whole-house and attic fans can be much larger loads than a bathroom fan, they often live on dedicated higher-amperage circuits, and the switching is frequently best done on the low-voltage control side or through a properly rated contactor, not by passing the full motor current through a small module. The relay’s job is often to drive a contactor or the fan’s control input. The line-voltage side and any high-amperage motor work should be done by a licensed electrician, and you must match the device rating to the fan’s actual nameplate amperage.
Hardware at a Glance
The table below maps each device to the case it fits, the kind of fan it suits, its fan-motor rating, and how it is powered. Match the rating to your fan’s nameplate, and treat prices as a separate question to confirm with a current retailer.
| Device | Best case / use | Fan type | Fan-motor rating | Power / notes |
|---|---|---|---|---|
| Zooz ZEN71 On/Off Switch | Case 1: replace the switch | Single exhaust fan | 3A fan motor | 120V, needs a neutral in the box |
| Zooz ZEN30 Double Switch | Case 1: replace the switch | Fan + light combo | Relay 1/2 HP for the fan; dimmer for the light only | 120V, needs a neutral; will not split one switched wire |
| Zooz ZEN51 Dry Contact Relay | Case 2: keep the switch | Single exhaust fan | 1/2 HP | 120-240V, fits at switch or fixture, manual-override input |
| Zooz ZEN52 Double Relay | Case 2: keep the switch | Fan + light combo | 1/4 HP per channel | 120-240V, two independent channels |
| Zooz ZEN17 Universal Relay | Case 3: no switch | Whole-house / attic fan | 20A NO / 1/4 HP NC | 12-24V or USB-C, NO/NC outputs plus sensor inputs |
| Zooz ZEN16 MultiRelay | Case 3: no switch | Multi-speed whole-house / attic fan | Three relays, 15A / 15A / 20A | 12-24V or USB-C; use DC Motor Mode so one speed runs at a time |
| Zooz ZEN78 High Power Relay | Case 3: no switch | Very large whole-house fan | 40A / 9600W resistive; 3 to 4 HP inductive | 120/240V, power monitoring and overload protection (metering not shown in Alarm.com); confirm support, electrician recommended |
| Aeotec Heavy Duty Smart Switch (ZW078) | Case 3: optional, when you want energy data in Alarm.com | Whole-house or attic fan (any size; not for bath/kitchen) | 40A, 120/240V loads | Power/energy monitoring supported in Alarm.com; 500-series Z-Wave (no Long Range); electrician recommended |
A note on these recommendations: we have no financial relationship with Zooz and do not earn commissions from recommending their products. We recommend these models because they have proven reliable for Alarm.com integrations in our experience, and because they offer the right combination of fan-motor-rated switching, dry-contact and low-voltage control, and Z-Wave Long Range support needed to automate home ventilation fans.
A couple of hardware notes that apply across the board. The in-wall line-voltage devices (ZEN51, ZEN52, ZEN71, ZEN30) are powered from 120V and generally need a neutral; if the switch box has no neutral, move a ZEN51 or ZEN52 to the fan or fixture. The ZEN17 and ZEN16 run on 12-24V or USB-C, which is why they suit low-voltage control and contactor-driven setups. None of these modules is rated for wet or outdoor exposure, so in a damp bathroom or an attic, mount the relay in a proper enclosure or the switch or fixture box and keep it dry. Newer Zooz models come in 800-series Z-Wave Long Range versions; on a Qolsys panel, enroll with Smart Start to get Long Range mode for better reach to a distant attic or fan, a detail covered in the digital outputs guide.
Smart Behavior: Triggers, Sensors, and Rules
Once the fan is an on/off device (light switch) in Alarm.com, the automation is where the project pays off. The most important thing to understand is how Alarm.com decides to act: its rule engine triggers reliably on sensor open and close events, on schedules, and on arming state. It does not trigger on a raw humidity or temperature percentage from a reporting sensor. That single fact shapes how you build the two marquee automations.
For a humidity-triggered bathroom fan, the reliable, low-cost method is a humidistat (a humidity switch) with a dry-contact output, not the kind that just switches line voltage to a fan. It closes or opens an isolated contact when humidity crosses an adjustable setpoint. You wire that dry contact into a sensor zone Alarm.com can see, either a hardwired zone through a hardwire-to-wireless translator or, more commonly, a wireless contact transmitter that has external input terminals (many encrypted door and window sensors and wireless universal transmitters have screw terminals for an external loop). Alarm.com then treats the humidistat exactly like a door sensor: when it trips because humidity is high, a rule turns the fan on and runs it for a set time (say 20 or 30 minutes), then turns it off. The timed shut-off is reliable precisely because the rule is what started the fan; keep in mind that Alarm.com only turns a fan off automatically if the automation turned it on, so the trick is to let the humidistat rule do the starting rather than expecting Alarm.com to catch a fan someone switched on by hand. A few things to get right: the unit needs a genuine isolated dry contact (a line-voltage-only humidistat would need an extra isolation relay), the transmitter or zone must be one that can be set up as a non-alarm sensor that works as an automation trigger rather than a burglary zone that sounds the siren, and you should not rely on a Z-Wave relay’s own input terminals for this, since Alarm.com treats those relays as plain switches and does not surface the input as a triggerable sensor. If you would rather not add a humidity sensor at all, a run-on timer or a motion rule (run the fan for a set time after the bathroom is used) still delivers most of the benefit.
A temperature-triggered whole-house or attic fan works the same way, and for the same reason. Because Alarm.com cannot trigger on a measured temperature reading, you use a temperature switch, a snap-disc thermal switch or an adjustable thermostat with a dry-contact output, wired into a sensor zone just like the humidistat. When the temperature crosses its setpoint, the contact trips and a rule turns the fan on and runs it for a set time before turning it off, the same trigger-then-timed-shutoff pattern as the bathroom fan (and, as there, the automatic shut-off works because the rule started the fan, not because Alarm.com can switch off a fan you turned on by hand). There is no true indoor-versus-outdoor differential rule here, since that would require Alarm.com to read and compare temperature values, which it does not do. An evening or overnight schedule is a reliable fallback that needs no sensor at all.
For whole-house fans, use door and window contact sensors as a condition on the automatic start: build the rule so the fan only turns on when enough windows read open, so the automation never starts it sealed up. Mind the limits, though. Because Alarm.com automatically turns a fan off only when its own automation turned it on, do not treat this as a real-time safety cutoff that will shut the fan down the instant a window closes. Keep automatic run times short, open the windows before the fan runs, and follow the fan’s manual for safe operation; the rule guards the automatic start, it does not replace safe operation. Beyond that, the everyday automations are familiar Alarm.com territory: a one-tap or voice “cooking” scene that switches the kitchen vent fan and light on together (a scene only turns devices on, so for an automatic shut-off use a rule or a schedule instead), motion or occupancy rules that run a bathroom or kitchen fan while the room is in use and then off after a set time, arming-aware rules that pause or change fan behavior when the system is armed Away or the family is on vacation, and plain schedules for a nightly whole-house-fan window or a summer attic-fan routine. All of it lives in the same app as your cameras, locks, and sensors.
The table below sums up the sensors that drive these rules, with rough price ranges. Treat the prices as approximate figures that vary by retailer, and confirm Alarm.com compatibility and automation-trigger support for any sensor with Surety Home.
| Sensor | What it automates | How it connects | Approx. price |
|---|---|---|---|
| Humidistat / humidity switch (dry contact) | Bathroom fan on rising humidity | Wired into a sensor zone via a wireless contact with input terminals or a hardwired zone | Around $20 to $60 |
| Motion / occupancy sensor | Bathroom or kitchen fan when the room is used, with a run-on timer | Enrolls as a standard Alarm.com sensor | Around $25 to $50 |
| Temperature switch / thermostat (dry contact) | Whole-house or attic fan on a temperature threshold; freeze awareness | Snap-disc or adjustable thermostat with a dry contact wired into a sensor zone (Alarm.com cannot trigger on a measured temperature reading) | Around $10 to $30; adjustable units higher |
| Door / window contact | Whole-house-fan window-open interlock, or run the bathroom fan when the door is closed | Standard Alarm.com contact sensor | Around $15 to $40 each |
Some readers will want a kitchen fan to kick on when a smoke or air-quality sensor trips. That is possible where Alarm.com exposes such a trigger, but be careful not to interfere with life-safety smoke detection, and treat it as a niche option rather than a core setup. In every case the pattern is the same: a sensor (or a humidistat or thermostat dry contact) is the trigger, the fan relay or switch is the action, and the same app runs both.
Benefits and Best Automation by Fan
Pulling it together, here is the quick version of which benefit and which trigger fit each fan, along with the one caveat to keep in mind for each.
| Fan | Main benefit of automating | Best trigger | Key caveat |
|---|---|---|---|
| Bathroom exhaust | Moisture and mold control | Humidistat to a sensor zone, or a run-on timer | Must vent outside; confirm humidity sensing with Surety |
| Kitchen exhaust | Clear smoke, steam, and odor faster | Motion rule or schedule with a run-on timer (cooking scene to start by hand) | Recirculating hoods help less than vented ones |
| Whole-house fan | Low-energy cooling | Evening/overnight schedule, or a temperature switch on a sensor zone | Needs open windows and attic venting; backdraft safety |
| Attic fan | Cut attic heat and roof load | Temperature switch on a sensor zone, or a seasonal schedule | Only helps if the attic is well sealed and vented |
Other Relay Brands Worth Knowing
We typically recommend Zooz relays for a few concrete reasons. Zooz devices are widely used and tested with Alarm.com and Qolsys panels, they are US Z-Wave frequency and easy to source with US support and a five-year warranty, they cover all three cases above within a single product family, and Zooz markets these exact uses, from fan motors to whole-house fan control. They are also relatively low cost, which makes them an easy choice when a small relay or switch is all the job needs. For an Alarm.com system, a relay that enrolls and reports reliably matters more than headline specs, which is why we standardize on Zooz.
The one credible alternative is the Shelly Qubino Wave line of Z-Wave in-wall relays. Its edge over the small Zooz fan relays is mainly physical: the modules are very compact, and the line carries Qubino’s heritage of no-neutral wiring options in some configurations, which can help in a tight or neutral-less box. A few things to confirm before buying: check compatibility with Surety Home, buy the US Z-Wave frequency version, and check the fan-motor rating against your specific fan, since in-wall relay motor ratings are often lower than their resistive ratings. Note too that the no-neutral problem is often already solved on the Zooz side by mounting a ZEN51 at the fan or fixture. And to clear up a common mix-up: GE/Jasco and Leviton “fan controls” are ceiling-fan speed controllers, a different product class that does not apply to exhaust or whole-house and attic fans.
Installation and Safety
Start with the most important point in this entire guide: if you are not completely sure you can do the wiring safely, hire a licensed electrician. This work involves 120V line voltage, and on larger fans higher amperage, where a mistake can mean shock, fire, or a damaged motor. Experienced do-it-yourselfers who are confident working in a powered switch box will do this themselves, and that is their call, but everyone else, anyone hesitating, anyone who has not safely worked with line voltage before, or anyone unsure how their fan is wired, should have an electrician do it. The cost of an electrician is small next to the risk, and there is no shame in hiring one.
If you do the work yourself, turn off the breaker and then confirm the wires are dead before you touch them. Use a non-contact voltage tester or a multimeter to verify there is no voltage at the wires, and test the tester on a known-live circuit first to be sure it is working. Never rely on the wall switch being off, and never assume the breaker is labeled correctly; verify at the wires. This applies to every line-voltage step in Cases 1 and 2. Pay just as much attention to your connections as to the voltage: a loose wire nut or a conductor that is not fully seated can work fine at first and then overheat and start a fire weeks or months later, which is one of the most common causes of electrical fires. Make every connection tight, give each wire a gentle tug to confirm it is secure, and do not cram a relay into a box so full that a connection can pull loose.
A few more practical notes. Bathrooms are damp locations and may carry GFCI and code requirements, so do the work to code and keep modules dry and enclosed. Confirm there is a neutral in the switch box for in-wall switches and relays; if not, move a ZEN51 or ZEN52 to the fan or fixture. Match the device rating to the fan’s nameplate amperage or horsepower, and never exceed it. Do not disable required ventilation: some bathrooms and kitchens have code-mandated ventilation, so automate for more airflow, not less, and never let a “smart” rule leave a moisture-prone room unventilated. For a whole-house fan, make sure there are adequate open windows and attic venting whenever it runs, and read the fan’s manual. Finally, test before you trust it: confirm the fan responds to the app and the wall switch, confirm the run-on timer behaves, and for a multi-speed fan confirm that only one speed runs at a time, before you rely on any schedule or rule.
Limitations and Realistic Expectations
These devices have limits. They give on/off control, scheduling, and rule and sensor triggers, not variable speed, and you should never put a light dimmer on a fan motor. Alarm.com rules trigger on sensor open and close events, not on measured humidity or temperature values, so both humidity and temperature automation require a switch (a humidistat or a temperature switch) with a dry-contact output wired into a supported sensor zone; a plain reporting sensor that only shows a number in the app will not drive a rule. Confirm the sensor, the zone setup, and automation-trigger support with Surety Home. And Alarm.com will turn a fan off automatically only when its own automation turned the fan on. The supported pattern is a rule or a schedule turns the fan on, then turns it off after a set time. A scene or a manual tap will not trigger that automatic shut-off, and it will not catch a fan someone switched on by hand and turn it off later, so the way to guarantee a fan never gets left running is to let a rule or a schedule do the turning on.
This is also not a substitute for a self-contained humidistat fan switch’s continuous closed-loop control; it is schedules, sensor-event triggers, and threshold rules. A fan only helps with moisture and odor if it actually vents to the outside, and whole-house fans require open windows and attic venting to operate safely, while attic fans only help if the attic is properly sealed and vented. And the safety stakes are real: simple exhaust-fan jobs are DIY-friendly with the breaker off and verified dead, but big whole-house and attic fans and dedicated circuits warrant an electrician.
Frequently Asked Questions
Can I make my bathroom fan turn on automatically when it gets humid? Yes. The most reliable low-cost method is a humidistat (a humidity switch) with a dry-contact output, wired into a sensor zone Alarm.com can see, through a wireless contact with input terminals or a hardwired zone. When humidity passes the setpoint the humidistat trips like a door sensor, and an Alarm.com rule turns the fan on and runs it for a set time before turning it off. That automatic shut-off works because the rule started the fan; Alarm.com only turns off a fan it turned on, so it will not rescue a fan someone switched on by hand and forgot. Humidistats run around $20 to $60. Confirm the sensor and rule setup with Surety Home, and if you would rather not add a sensor, a motion rule that runs the fan for a set time after the bathroom is used still automates most of the benefit. The EPA recommends keeping indoor humidity below 60 percent, ideally 30 to 50 percent, to limit mold.
Should I replace the switch or add a relay behind it? Replace the switch (Case 1) if you have a neutral in the box, the fan load fits the switch’s fan-motor rating, and you do not mind a new switch look. Add a relay (Case 2) if you want to keep your existing switch, you have no neutral in the box (mount the relay at the fan instead), or a fan and light share one switch and you want to split them.
What relay should I use for a bathroom or kitchen exhaust fan? To keep your switch, use the Zooz ZEN51 Dry Contact Relay (rated for 1/2 HP fan motors) for a single fan, or the Zooz ZEN52 Double Relay (1/4 HP per channel) for a fan and light combo. To replace the switch, use the Zooz ZEN71 On/Off Switch (3A fan motors) for a single fan, or the Zooz ZEN30 Double Switch (fan on its relay button, light on the dimmer) for a combo.
What about a whole-house or attic fan? Use the Zooz ZEN17 Universal Relay, which Zooz markets for whole-house fan and HVAC control, or the Zooz ZEN16 MultiRelay if you need to select among a multi-speed fan’s fixed speeds, one at a time. For an oversized motor beyond the ZEN17’s 20A and 1/2 HP rating, the Zooz ZEN78 High Power Relay handles up to 40A and a 3 to 4 HP motor load. If you want to see a whole-house or attic fan’s energy use in the Alarm.com app, even on a normal-sized fan, the Aeotec Heavy Duty Smart Switch (ZW078) is an optional pick whose power monitoring is supported in Alarm.com (the ZEN17 stays the simpler default); the tradeoff is that it uses older 500-series Z-Wave with no Long Range. This is a whole-house and attic fan idea only, not worth it for a small bath or kitchen fan. These are bigger motor loads, often on dedicated circuits, and the switching is best done on the low-voltage or contactor side, so involve a licensed electrician.
Can I control fan speed? Not continuously with these devices; they are on/off. Most exhaust fans are single-speed anyway. For a multi-speed fan you can use a multi-relay to pick among its existing speed taps, but do not put a light dimmer on a fan motor.
Is this safe to wire myself? If you are not completely confident working with line voltage, hire a licensed electrician; that is the right answer for anyone who is unsure. A simple single-exhaust-fan switch swap or relay install is DIY-friendly for an experienced person who turns off the breaker, confirms the wires are dead with a voltage tester or multimeter, and works to code (bathrooms are damp locations). Large whole-house and attic fans, dedicated high-amperage circuits, and any uncertainty should go to a licensed electrician.